

Embarking on the journey of establishing your own WordPress ecommerce store holds immense potential for both fulfillment and financial gain. Whether you opt for a dropshipping model, effortlessly connecting customers with products without the burden of inventory management, or decide to craft and showcase your own unique creations like handmade jewelry, the realm of ecommerce within WordPress offers boundless opportunities.
While WooCommerce stands as the go-to choice for most, boasting flexibility and robust features, it’s just the tip of the iceberg. A plethora of plugins and tools await, tailored to suit various needs and preferences.
In this guide, we’ll unveil the essential steps to seamlessly set up your WordPress ecommerce venture, ensuring you’re equipped with the knowledge and resources to thrive in the digital marketplace.
WordPress Ecommerce Website Development: A Statistical Overview
WordPress has emerged as a popular platform, not only for blogging but also for eCommerce website development. Its flexibility, ease of use, and a robust ecosystem of plugins and themes make it a preferred choice for many online retailers.
Here are some WordPress eCommerce website development statistics for 2024:
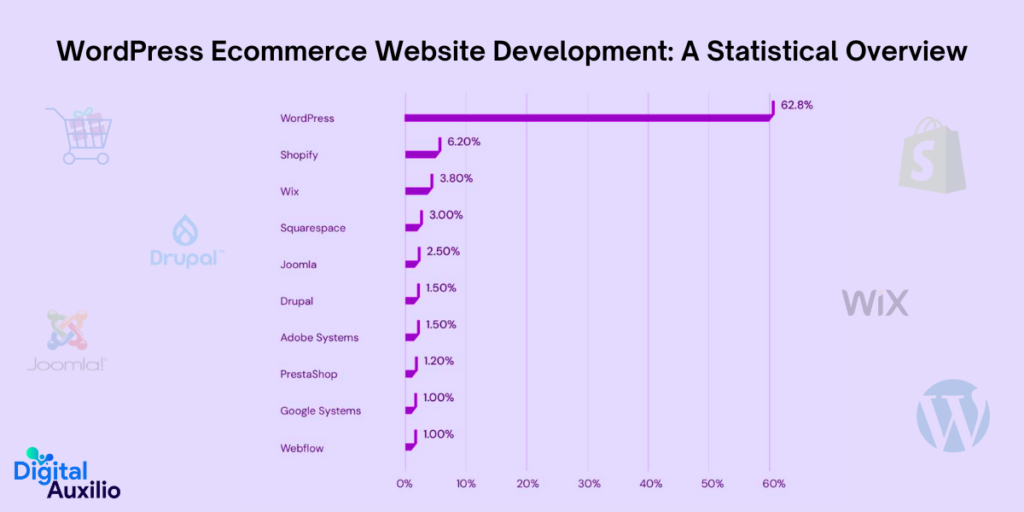
- WooCommerce is the most popular eCommerce platform, with a 38.74% market share.
- Over 4.6 million stores are built with WooCommerce, which is 9.1% of all eCommerce sites.
- 20.4% of WordPress websites use WooCommerce.
- WordPress has a 63.3% market share of the entire CMS market.
- 43.1% of websites will use WordPress in 2024.
- Over 500 new websites are built with WordPress every day.
- There are almost 59,000 free WordPress plugins in the WordPress Plugin Directory.
- 36.28% of the top 1 million websites use WordPress.
- 2.9 million people search for the term “WordPress” on Google every month.
- WordPress usage continues to rise steadily, with over 2 million downloads every year.

Why WordPress is the Ultimate Choice for eCommerce Website Development?
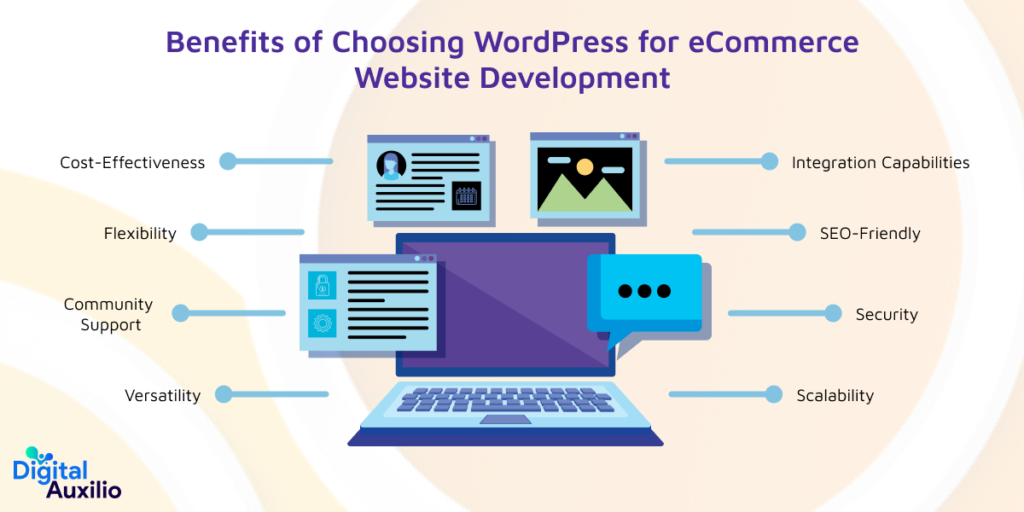
WordPress stands out as the ultimate choice for eCommerce website development due to its unparalleled versatility and robust features. As the leading content management system (CMS), WordPress offers a myriad of advantages that make it the preferred platform for creating online stores.
1. Versatility:
WordPress is renowned for its versatility, serving as an all-encompassing content management system (CMS) suitable for various website types. Its open-source nature allows for extensive customization, making it ideal for crafting tailored eCommerce solutions.
2. Community Support:
With a vast community of developers and enthusiasts, WordPress boasts robust support systems. This ensures continuous updates, security patches, and an extensive array of plugins and themes tailored specifically for eCommerce needs.
3. Cost-Effectiveness:
Being open-source, WordPress is free to use, minimizing initial investment costs. Moreover, a plethora of free plugins and themes are available, reducing the need for extensive development expenses. While additional costs such as hosting and premium add-ons exist, they are comparable or even lower than other ecommerce platforms.
4. Flexibility:
WordPress offers unparalleled flexibility in design and functionality. Whether you’re a beginner or an experienced developer, its intuitive interface allows for easy customization, enabling you to create a unique online store tailored to your brand’s identity and requirements.
5. Scalability:
As your eCommerce venture grows, WordPress ensures scalability without compromising performance. With its robust architecture and extensive plugin ecosystem, you can seamlessly expand your store’s capabilities to accommodate increasing traffic and sales volumes.
6. SEO-Friendly:
WordPress is inherently optimized for search engines, offering various plugins and features that enhance your site’s visibility and ranking on search engine results pages (SERPs). From customizable URLs to SEO plugins like Yoast SEO, WordPress empowers you to implement effective SEO strategies to drive organic traffic to your eCommerce store.
7. Security:
While no platform is entirely immune to security threats, WordPress prioritizes security measures to safeguard your eCommerce site against potential vulnerabilities. Regular updates, secure coding practices, and the availability of security plugins ensure robust protection against malicious attacks and data breaches.
8. Integration Capabilities:
WordPress seamlessly integrates with a plethora of third-party services and tools, allowing for enhanced functionality and automation within your eCommerce ecosystem. Whether it’s payment gateways, shipping solutions, or marketing tools, WordPress facilitates effortless integration to streamline operations and enhance the customer experience.
Steps to Create WordPress Ecommerce Website
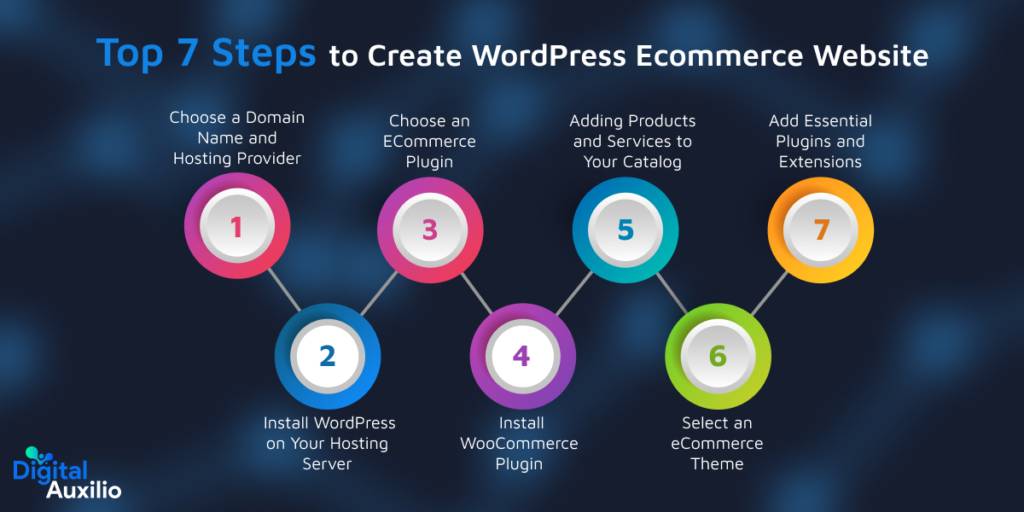
Creating a WordPress ecommerce website involves several steps, from setting up hosting to designing the site and adding products. Here’s a step-by-step guide to help you generate content for your WordPress ecommerce website:
1. Choose a Domain Name and Hosting Provider:
The first step in creating your WordPress ecommerce website is selecting a suitable domain name and hosting provider. Your domain name serves as your online identity, so opt for one that is memorable, relevant to your business, and preferably ends with a .com extension for credibility. Keep it short, and easy to spell, and avoid hyphens or double letters to enhance accessibility. Incorporating relevant keywords can also boost your site’s visibility in search results.
Once you’ve decided on a domain name, it’s time to choose a hosting provider. Consider factors such as server reliability, speed, storage capacity, and compatibility with WordPress. Popular hosting providers like Bluehost, GoDaddy, and InMotion Hosting offer various plans tailored to different business needs. Pay attention to introductory prices and long-term costs, as well as cancellation policies, to make an informed decision that aligns with your budget and requirements.
Since many hosting plans include a free domain for the first year, take advantage of this opportunity to secure your chosen domain name and hosting together. This helps streamline the setup process and reduces upfront expenses for launching your WordPress ecommerce site.
2. Install WordPress on Your Hosting Server
Installing WordPress on your hosting provider is a straightforward process, typically offered through both manual and automatic installation methods. Here’s an overview of each method and how to troubleshoot common installation issues:
Manual Installation
1. Download WordPress: Start by downloading the latest version of WordPress from the official website (wordpress.org).
2. Upload WordPress Files: Access your hosting account’s file manager or use an FTP client to upload the WordPress files to your server. You can upload the files to the root directory or a subdirectory, depending on your preference.
3. Create a Database: Log in to your hosting control panel and create a new MySQL database and user. Note down the database name, username, and password for later use.
4. Configure wp-config.php: In the WordPress files you uploaded, locate the wp-config-sample.php file. Rename it to wp-config.php and open it in a text editor. Enter the database information you obtained earlier.
5. Run the Installation: Open your web browser and navigate to the URL where you uploaded WordPress files. You will be prompted to complete the installation by providing your site title, admin username, password, and email address.
6. Complete Setup: Once installation is complete, log in to your WordPress dashboard using the credentials you created. You can now start customizing your website.
Automatic Installation
Many hosting providers offer one-click installation options for WordPress through their control panels, such as cPanel or Plesk.
- Log in to your hosting account’s control panel and locate the WordPress installer tool.
- Click on the installer tool and follow the on-screen prompts to select your domain, configure installation settings, and initiate the installation process.
- Once installation is complete, you will receive confirmation along with your WordPress login credentials.
Troubleshooting Common Installation Issues
- Incorrect File Permissions: Ensure that the files and directories have the correct permissions set. Directories should typically have permissions set to 755, while files should have permissions set to 644.
- Database Connection Errors: Double-check the database information entered in the wp-config.php file, including the database name, username, password, and host.
- White Screen of Death: If you encounter a white screen after installation, it may indicate a PHP error. Check your error logs for more information, or try increasing the memory limit in your wp-config.php file.
- Installation Stalls: If the installation process stalls or fails to complete, try restarting the process from scratch or contact your hosting provider for assistance.
3. Choose an ECommerce Plugin
When it comes to selecting an eCommerce plugin for your WordPress website, you have several options to consider. The most widely used and versatile plugin is WooCommerce, which offers a comprehensive suite of features for setting up and managing your online store. With WooCommerce, you can create product pages, manage inventory, process payments, and track important statistics, making it a popular choice among website owners.
However, if you’re looking for alternative options, you can explore plugins like WP eCommerce and Easy Digital Downloads. While these plugins may not have as large of a user base as WooCommerce, they still provide essential features for running an ecommerce store.
1. Shopify:
Shopify is a standalone ecommerce platform that also offers a WordPress plugin, allowing you to integrate Shopify’s powerful ecommerce features with your WordPress site. With Shopify, you can create an online store with customizable themes, manage products and inventory, accept payments, and benefit from additional features like marketing tools and analytics.
2. Easy Digital Downloads (EDD):
If you primarily sell digital products such as software, ebooks, or digital downloads, Easy Digital Downloads is a lightweight and user-friendly ecommerce plugin designed specifically for digital goods. It offers features for managing digital products, file downloads, customer accounts, and payment gateways tailored to digital transactions.
3. BigCommerce:
Similar to Shopify, BigCommerce is a standalone ecommerce platform that offers a WordPress plugin for integration. It provides a range of ecommerce features, including product management, secure payment processing, shipping options, and marketing tools. BigCommerce is suitable for growing businesses with complex ecommerce needs.
4. Ecwid:
Ecwid is a versatile ecommerce solution that allows you to add an online store to your existing website, including WordPress. It offers features for product management, multiple payment options, international shipping, and integration with social media platforms and marketplaces. Ecwid is known for its ease of use and seamless integration with WordPress websites.

4. Install WooCommerce Plugin:
To begin setting up your ecommerce store on WordPress, you’ll need to install the WooCommerce plugin. Follow these steps to seamlessly integrate WooCommerce into your website:
1. Log in to WordPress Dashboard: Use the login credentials you created during the WordPress installation process to access the WordPress Dashboard.
2. Navigate to Plugins: Once logged in, locate the “Plugins” option in the WordPress Dashboard menu.
3. Click on “Add New”: From the dropdown menu under Plugins, select “Add New.” This will take you to the Add Plugins page where you can search for and install new plugins.
4. Search for WooCommerce: In the search bar on the Add Plugins page, type “WooCommerce” and press Enter. You should see a series of WooCommerce plugins appear in the search results.
5. Install WooCommerce: Look for the main WooCommerce plugin (without any additional modifiers) and click on the “Install Now” button next to it. WordPress will now download and install the WooCommerce plugin onto your website.
6. Follow the Setup Wizard: Once the installation is complete, you’ll be prompted to activate the WooCommerce plugin. Click on the “Activate” button to activate the plugin and initiate the setup wizard.
7. Configure WooCommerce Settings: The setup wizard will guide you through configuring basic settings for your ecommerce store, such as your store’s location, currency, and payment methods. Take some time to review and adjust these settings according to your preferences.
8. Explore WooCommerce Features: After completing the setup wizard, take some time to familiarize yourself with the features of WooCommerce. The main components include the Shop (where products are displayed), Cart (where customers review and adjust their orders), Checkout pages (which guide customers through the purchase process), and My Account (where customers can view order details and manage their accounts).
9. Set Up Payment Methods: Choose a payment method for your store, such as PayPal or Stripe. If you don’t already have accounts with these platforms, you’ll need to create them and link them to your WooCommerce store.
5. Adding Products and Services to Your Catalog:
Expanding your ecommerce store’s catalog involves adding products or services to entice potential customers. Follow these steps to effectively showcase your offerings:
1. Access Your Dashboard: Log in to your WordPress Dashboard and navigate to the “Products” tab.
2. Click on “Add Product”: Select the “Add Product” option to begin adding a new item to your catalog.
3. Fill in Product Details: Provide comprehensive details for each product or service to ensure clarity and minimize returns. Include the following information:
- Product Name: Choose a descriptive and captivating name that accurately represents the item.
- Product Image: Upload high-quality images that showcase the product from multiple angles and in various contexts.
- Description: Craft a detailed description that highlights key features, benefits, and specifications. Incorporate relevant keywords to enhance SEO and improve visibility in search results.
- Price: Set the appropriate price for the product or service.
- Inventory Management: Specify stock quantity and enable options for managing inventory, such as stock keeping units (SKUs) and stock status.
- Categories and Tags: Assign relevant categories and tags to organize products and improve navigation within your store.
- Product Variations: If applicable, configure product variations such as size, color, or material.
- Shipping Options: Define shipping methods, rates, and restrictions for the product.
- Additional Attributes: Include any additional attributes or custom fields relevant to the product.
- Related Products: Link related products or upsell items to encourage cross-selling.
4. Optimize for SEO: Utilize the product description and metadata fields to incorporate relevant keywords and optimize for search engines. This will help improve the visibility of your products in search engine results pages (SERPs) and attract more organic traffic to your store.
5. Review and Publish: Double-check all product details for accuracy and completeness. Once satisfied, click the “Publish” button to make the product available in your store.
By following these steps, you can efficiently add products and services to your ecommerce catalog, providing potential customers with clear and enticing offerings to browse and purchase. Continuously update and optimize your product listings to maintain relevance and drive sales growth.
6. Select an eCommerce Theme:
Customizing the appearance of your ecommerce store is crucial to creating a visually appealing and engaging online shopping experience for your customers. Follow these steps to select and install an ecommerce theme that aligns with your store’s objectives:
1. Explore Theme Options:
Begin by browsing through various WordPress theme options to find one that resonates with the aesthetic and branding of your store. You can search for themes on third-party theme marketplaces or directly within the WordPress theme directory.
2. Consider Colors and Layouts:
Pay attention to the color schemes, layouts, and design elements offered by each theme. Choose a theme that complements your products or services and reflects the overall style and tone of your brand. Whether you prefer a minimalist design, bold colors, or elegant typography, select a theme that best represents your store’s identity.
3. Free vs. Premium Themes:
Decide whether you want to opt for a free theme or invest in a premium theme for a more customized look and advanced features. While free themes offer basic customization options, premium themes often provide more flexibility, support, and additional functionalities tailored to ecommerce websites.
4. Installation Process:
Once you’ve chosen a theme, log in to your WordPress Dashboard and navigate to the “Appearance” tab. Click on “Themes” and then select “Add New.” From there, you can upload the theme file or search for the theme directly within the WordPress theme directory. Once the theme is uploaded or found, click on the “Install” button to download it to your directory.
5. Activate the Theme:
After the theme is successfully installed, you’ll see an option to “Activate” it. Click on “Activate” to apply the new theme to your ecommerce store. Your WordPress store will instantly transform to reflect the chosen theme’s design and layout.
6. Customize as Needed:
Once the theme is activated, you can further customize its appearance and settings to suit your preferences. Explore the theme customization options provided within the WordPress Customizer or theme settings panel to adjust colors, fonts, layouts, and other design elements to your liking.
By selecting an ecommerce theme that aligns with your store’s objectives and aesthetics, you can create a visually appealing and cohesive online shopping environment that enhances the overall user experience and drives sales. Regularly evaluate and update your theme to stay current with design trends and ensure optimal performance for your ecommerce store.
7. Add Essential Plugins and Extensions:
Expand the capabilities of your WordPress ecommerce website by incorporating useful plugins and extensions that enhance business management, customer experience, and overall functionality. Here are some essential plugins and extensions to consider adding:
1. Payment Gateway Plugins:
Increase payment options for your customers by integrating payment gateway plugins such as PayPal Pro, Authorize.Net, or Stripe. These plugins allow you to accept a wider range of payment methods, including credit cards, digital wallets, and bank transfers, expanding your customer base and improving checkout convenience.
2. Analytics Plugins:
Gain valuable insights into your website’s performance and customer behavior with analytics plugins like Google Analytics or MonsterInsights. These plugins provide detailed reports and metrics to help you understand which products are popular, track conversion rates, and identify areas for optimization to drive business growth.
3. SEO Plugins:
Improve your store’s visibility in search engine results and attract more organic traffic with SEO plugins like Yoast SEO or Rank Math. These plugins provide tools for optimizing on-page content, meta tags, XML sitemaps, and more to enhance your site’s search engine optimization efforts.
4. Performance Optimization Plugins:
Optimize the speed and performance of your ecommerce site with plugins like WP Rocket or W3 Total Cache. These plugins help minimize page load times, improve server response times, and optimize website assets for faster performance, resulting in a better user experience and higher conversion rates.
5. Tax Calculation Plugins:
Simplify tax management and compliance with tax calculation plugins such as TaxJar or WooCommerce Tax. These plugins automatically calculate and apply sales tax rates based on customer location and product type, ensuring accurate tax calculations and reducing the risk of tax-related errors.
6. Subscription Management Plugins:
Streamline subscription-based sales and recurring revenue with subscription management plugins like WooCommerce Subscriptions or MemberPress. These plugins enable you to offer subscription plans, manage customer subscriptions, and automate billing processes, providing a seamless experience for both you and your subscribers.
7. CRM Integration Plugins:
Enhance customer relationship management by integrating CRM (Customer Relationship Management) plugins such as HubSpot or Salesforce. These plugins allow you to capture customer data, track interactions, and segment your audience for targeted marketing campaigns, fostering stronger relationships and increasing customer retention.
8. Inventory Management Plugins:
Efficiently manage inventory levels and stock tracking with inventory management plugins like WooCommerce Inventory Management or TradeGecko. These plugins offer features for monitoring stock levels, setting alerts for low inventory, and synchronizing inventory across multiple sales channels, ensuring optimal inventory control and order fulfillment.
9. Security and Backup Plugins:
Protect your website from security threats and data loss with security and backup plugins such as Wordfence Security or BackupBuddy. These plugins offer features for malware scanning, firewall protection, and automatic backups, safeguarding your website and customer information against potential risks.
In Conclusion,
Creating a WordPress ecommerce website entails leveraging the expertise of professionals in WordPress development services. By opting for custom WordPress website development, you ensure a tailored solution that meets your specific business needs.
Hiring WordPress developers adept in ecommerce website development is essential for crafting a user-friendly interface, seamless navigation, and secure payment gateways. Whether you’re a startup or an established business, investing in a WordPress website development company like Digital Auxilio can streamline the process, ensuring a responsive and visually appealing online store.
For further inquiries or assistance, feel free to contact us at Digital Auxilio, where we’re committed to delivering top-notch WordPress solutions for your eCommerce venture.
FAQs
1. How do I choose the best hosting for my WordPress ecommerce website?
Look for hosting providers that offer specialized WordPress hosting with good performance, security features, scalability, and excellent customer support. Consider factors like uptime, bandwidth, storage, and ease of WordPress integration.
2. Which WordPress ecommerce plugin should I use?
There are several popular ecommerce plugins available for WordPress, including WooCommerce, Easy Digital Downloads, and Shopify’s official plugin. WooCommerce remains a top choice due to its flexibility, extensive features, and large community support.
3. How do I install WordPress on my hosting server?
Most hosting providers offer one-click WordPress installation through tools like Softaculous or Fantastico. Alternatively, you can manually install WordPress by downloading the latest version from wordpress.org and following the installation instructions provided.
4. What are the essential features I need in an ecommerce theme?
Look for a responsive design, customizable layout, product showcase options, integration with popular plugins like WooCommerce, SEO optimization, and good loading speed. Make sure the theme is regularly updated and well-supported by the developer.
5. How do I set up payment gateways on my WordPress ecommerce site?
WooCommerce supports various payment gateways such as PayPal, Stripe, Square, and more. After installing WooCommerce, you can configure your preferred payment gateways by entering your account credentials in the settings.
6. How can I add products to my WordPress ecommerce website?
In your WordPress dashboard, navigate to the WooCommerce section and click on “Products” to add new products. Fill in the product details such as title, description, price, and images. You can organize products into categories and tags for easier navigation.
7. How do I optimize my WordPress ecommerce website for SEO?
Install an SEO plugin like Yoast SEO or Rank Math to optimize your website’s on-page SEO elements such as meta titles, descriptions, headings, and sitemaps. Focus on keyword research, high-quality content, fast loading speed, mobile-friendliness, and secure HTTPS connection.
8. What security measures should I take to protect my WordPress ecommerce site?
Keep WordPress, themes, and plugins updated regularly to patch security vulnerabilities. Use strong passwords, implement SSL/TLS encryption, enable firewall protection, install security plugins like Wordfence or Sucuri, and regularly backup your website data.
9. How can I improve the performance of my WordPress ecommerce website?
Optimize images, use caching plugins like WP Super Cache or W3 Total Cache, enable lazy loading for images and videos, minify CSS and JavaScript files, and choose a reliable hosting provider with fast servers and CDN support.
10. What ongoing maintenance tasks are necessary for a WordPress ecommerce site?
Regularly update WordPress core, themes, and plugins to the latest versions. Monitor website performance, security, and backups. Keep an eye on customer feedback, analytics data, and sales reports to identify areas for improvement and optimization.


Add comment